CONCEPT 1 – MEASURING UNITS AND DIMENSIONS
The focus of this objective is to establish informal arguments for the formulas relating to perimeter, area, and volume. We want students to not only to be able to use these formulas to solve problems but we also want them to understand where they come from.
The nice thing about these formulas is that they tend to build on each another. The rectangle formula is the basis for all other polygon formulas. The rectangle provides us the most basic two dimensional formula – the multiplication of the two perpendicular dimensions. It doesn’t get more basic than this. As the shapes become more complex so do the formulas but they all are based off that powerful concept that the area is found by multiplying the two perpendicular dimensions to determine the number of square units in the shape.
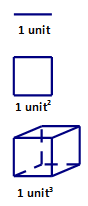
Dimensions are important to understand in this unit. As we progress though the dimensions our units of measurement change. So for example, the items that we measure in one dimension are perimeters, distances, and circumferences. All of these are lengths and exist in one dimensional space. In two dimensions, we move into area and square units we begin to measure the number of square units within the shape. This of course is where we begin to measure rectangles, triangles, trapezoids, circles, and many other two dimensional shapes. Finally, we will look at three dimensional shapes as well. In this dimension we measure the number of unit cubes that fill the space within the shape. This is where we will look at pyramids, cones, prisms and many other three dimensional objects. |
 |
CONCEPT 2 – ONE DIMENSIONAL MEASUREMENT
| Teacher Note: This objective only speaks to circumference and area of a circle. The other area relationships are handled in early years but I feel it necessary to establish these relationships at this time. Too often formulas are simply told and used and not understood. You will see my emphasis on understanding. |
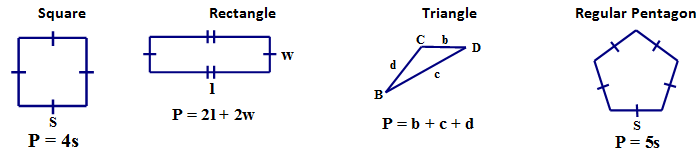
POLYGON PERIMETER
Perimeter refers to the distance around the edge of a closed figured shape. Perimeter formulas are often quite simple because they sum of the sides of a polygon. In some figures we can create condensed forms of this relationship because of the side properties of the polygon.
CIRCLE PERIMETER - CIRCUMFERENCE
The perimeter of a circle is called its circumference. The circumference of a circle is the distance around the edge of the circle or in other words, the arc length of the circle. To discover the circumference formula we need to look at the relationship between the diameter and the circumference. The ratio between these two values will reveal one of the greatest numbers of all time, Π.
 |
Notice that each time we get just over three diameters. It was this pattern that led many to explore what the value was. The histo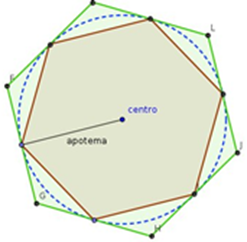 ry of pi is a great historical topic to study and if time permitted I would strongly suggest you have your students investigate it further. We learn that depending on the culture and the time period pi has received different approximate values for its irrational value. The ancient Babylonians use the value of 3, while the Egyptian Rhind Papyrus notated pi to be 3.1605. Archimedes of Syracuse (287-212 BC), one of the great Greek mathematicians using regular polygons to approximate a circle was able to narrow down the value between 3 1/7 and 3 10/71. As time continued many mathematicians were able to establish ways to determine more and more correct digits of pi, for instance by 1699 the first 71 digits had been calculated correctly. Determining of digits of pi was a mathematical pursuit by many great scholars. Again this is a fascinating history and it would be a nice exploration for your students. ry of pi is a great historical topic to study and if time permitted I would strongly suggest you have your students investigate it further. We learn that depending on the culture and the time period pi has received different approximate values for its irrational value. The ancient Babylonians use the value of 3, while the Egyptian Rhind Papyrus notated pi to be 3.1605. Archimedes of Syracuse (287-212 BC), one of the great Greek mathematicians using regular polygons to approximate a circle was able to narrow down the value between 3 1/7 and 3 10/71. As time continued many mathematicians were able to establish ways to determine more and more correct digits of pi, for instance by 1699 the first 71 digits had been calculated correctly. Determining of digits of pi was a mathematical pursuit by many great scholars. Again this is a fascinating history and it would be a nice exploration for your students.
Circumference = Πd = 2Πr
CONCEPT 3 – TWO DIMENSIONAL MEASUREMENT
THE RECTANGLE
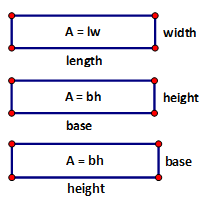
The most basic two dimensional figure is the rectangle. Due to its perpendicular adjacent sides we are able to determine the number of ‘square’ units within the shape by multiply the two dimensions of the rectangle together. This results in the formula, Area = (length)(width) or Area = (base)(height). These four terms are important to define and so we will do that now.
Length of a Rectangle – the longer dimension of the rectangle.
Width of a Rectangle – the shorter dimension of the rectangle.
Base of a Rectangle – a base is a side of the rectangle.
Height of a Rectangle – the height is the perpendicular adjacent side to the base of the rectangle.
The truth is that because the sides of a rectangle are perpendicular, these values are interchangeable. |
 |
A BASE AND HEIGHT MUST ALWAYS BE PERPENDICULAR TO EACH OTHER.
THE PARALLELOGRAM
The parallelogram formula relies heavily on the area of a rectangle. The general parallelogram has adjacent sides that are not perpendicular so we cannot simply do as we did for the rectangle by multiplying the two adjacent sides. The two measurements are not perpendicular to each other and so it would not determine the number of ‘square’ units within the shape. We do see though a nice way to alter a parallelogram to get a recta ngle. If we cut off the ‘slanted’ piece and move it over to the opposite side we can form a rectangle. The process of cutting up shapes up into smaller pieces and moving them around to form a new shape is called DISSECTION. Dissection is common way to investigate area relationships because the areas of the pieces preserve the total area of the original shape. ngle. If we cut off the ‘slanted’ piece and move it over to the opposite side we can form a rectangle. The process of cutting up shapes up into smaller pieces and moving them around to form a new shape is called DISSECTION. Dissection is common way to investigate area relationships because the areas of the pieces preserve the total area of the original shape.
| Teacher Note: Dissection is a very important skill in geometry and in life. To be able to see the shape as a group of pieces and then to arrange it differently to analyze it from a different perspective. Almost all of the early geometric area proofs came from a dissection approach because the piece mantains its area. |
PARALLELOGRAM AREA – DISSECTION
The most common method for determine the area formula for a parallelogram is to dissect the shape as follows.

We perform a translation of the triangle to its opposite side. This changes our parallelogram into a rectangle with the same area. The new rectangle has the exact same base and height as the original parallelogram and so the formula for a parallelogram is the same as a rectangle, Area = (base)(height) = bh.
PARALLELOGRAM AREA – SHEARING
Another way to determine the area formula for a rectangle is to use a technique that is also very helpful when working with area called SHEARING. Shearing is a transformation in which all points in one line remain fixed while all other points move parallel to the fixed line by a proportional distance. So in the case of a parallelogram if we fix one side and then translate the opposite side along a parallel path to the fixed side we shear the shape. The advantage of this process is that the base and height of the parallelogram remain the shape even though the shape is changing. If we do this process until the adjacent sides of the parallelogram are perpendicular, then we have transformed our parallelogram into a rectangle that has the same base and height. This of course means that the areas of these two figures are the same and their formulas must also be the same, Area = (base)(height) = bh.
| Teacher Note: Shearing is a new skill for students and yet it is very powerful. Shearing was used by Euclid to do one of the proofs of the Pythagorean Theorem - it is a classic. |
THE TRIANGLE
The triangle area formula also relies heavily on the area of a rectangle. There are a number of different ways to conceptually understand the area formula for a triangle. We will look at a few of them. Each method will not only help us work with triangles but with many other polygons as well.
Formulas are derived by how one perceives the situation. There are often two approaches to this in area… Do you see the shape as a shape within a larger shape or do you see it as a shape made up of many smaller pieces. In other words, do you see the shape as a piece of a whole or do you see it as the whole with pieces within it? First we will look at the triangle as a piece of a larger whole and the larger whole will be a rectangle.
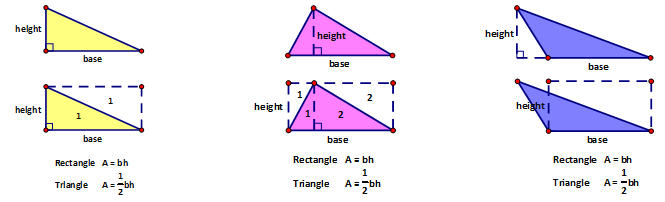
TRIANGLE AREA – HALF OF THE WHOLE
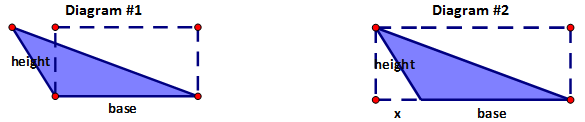
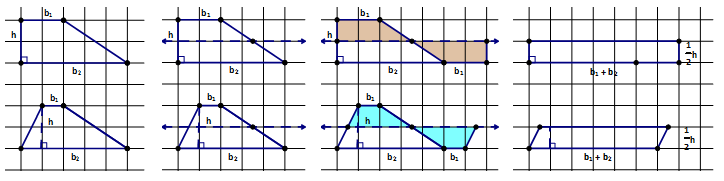
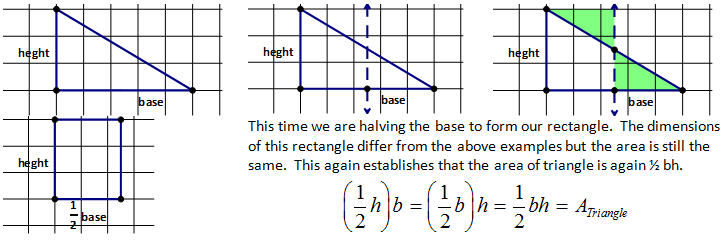
In the first two examples we can easily see how a triangle is exactly half the area of the rectangle that has the same base and height as it. In the third example, it isn’t quite as easy because the rectangle is not the one that encloses it as it was in the first two examples. The rectangle that encloses the third example is NOT the rectangle that the triangle is half the area of.
It is hard for a student to understand why the rectangle in diagram #2 is not the correct rectangle and because of the shape of the triangle is hard to prove or disprove it by dissection. This is another situation when shearing helps us greatly visualize the correct relationship. If we fix the base and then move the vertex opposite the fixed base on a parallel line the area remains fixed because the base and height do not change. By shearing the triangle we can inscribe the triangle in the rectangle that has the same height and base, thus again establishing that Area of a triangle is ½ (base)(height).
All of these triangles are have the same area because they have the same height and base and all of them are exactly half the area of the rectangle with the same base and height, thus Area = ½ bh.
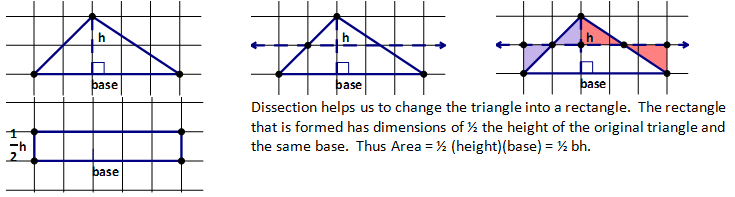
TRIANGLE AREA – DISSECTION
Another common technique for determining area is to cut the shape up into smaller pieces and then to reorganize them into a shape that is easier to work with. This is a great method for area because each piece maintains its original area value and so whatever the new shape is it will have the same area as the original shape. So we are going to take a triangle and see if we can form a rectangle from it and then see what the dimensions of the rectangle are compared to our original triangle.
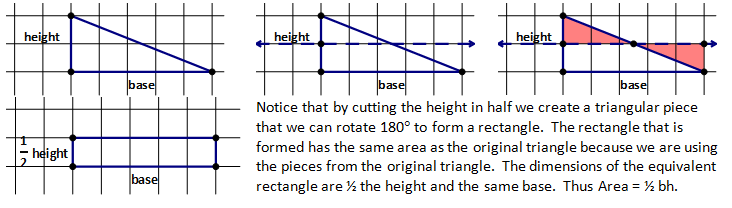
Let us try this again with an oblique triangle to verify that this can work with any triangle.
This same process can be used to create a rectangle with the same area but with different dimensions than the above two examples. This is possible because of the commutative property of multiplication, (½ height)(base) = (height)(½ base).
THE TRAPEZOID
The trapezoid has the most unique formula of all the basic polygons and very few students know where it comes from. It is for this reason that many students struggle to remember it. For them it has no meaning and no context. Unlike a triangle being half of a rectangle or a parallelogram being a sheared rectangle, the trapezoid is just a formula. Where does the Area = ½ (b1 + b2)h come from?
Before demonstrating this we need to first discuss some particular terms to this polygon. A trapezoid has two parallel sides; these two sides are called the bases of the trapezoid. They are usually denoted as b1 and b2 for base 1 and base 2. If the trapezoid is an isosceles trapezoid then the two non-base sides are congruent and are called the legs of the trapezoid, just as we do in an isosceles triangle.
| Teacher Note: The trapezoid is the most confusing and hardest to remember for students. Below are multiple different ways to explain where its formula comes from. |
TRAPEZOID AREA – HALF OF THE WHOLE (DOUBLING TECHNIQUE)
One way to work with a trapezoid is to create two of them, thus doubling the area. To create the second trapezoid you rotate the original about the midpoint of one of the non-base sides. In doing this you will create either a rectangle or a parallelogram with the same height and a base of (b1 + b2). The area of a rectangle/parallelogram is (b1 + b2)(height), thus making the area of the trapezoid ½ (b1 + b2)(height).
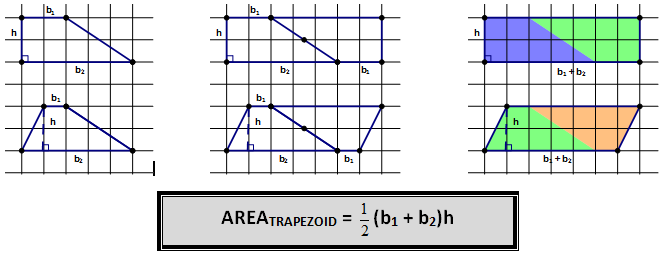
TRAPEZOID AREA – DISSECTION (HALVING TECHNIQUE)
We can also use dissection to demonstrate this wonderful formula. Doing a similar technique as we did with the triangle we can cut the height in half to create some pieces and then rearrange them to form a rectangle.
This creates a rectangle with dimensions, ½ the height of the trapezoid and the base of length b1 + b2.
TRAPEZOID – DISSECTION (THE PIECES MAKE THE WHOLE)
A trapezoid is really just a composite shape – a shape made up of two or more other shapes and depending on which shapes you see within the trapezoid will depend on how you come about deriving the formula for the trapezoid. This is a wonderful exercise for a class – to try to derive the formula for a trapezoid based on the different composite shapes within the trapezoid.
Let’s do two examples to show you how these work.
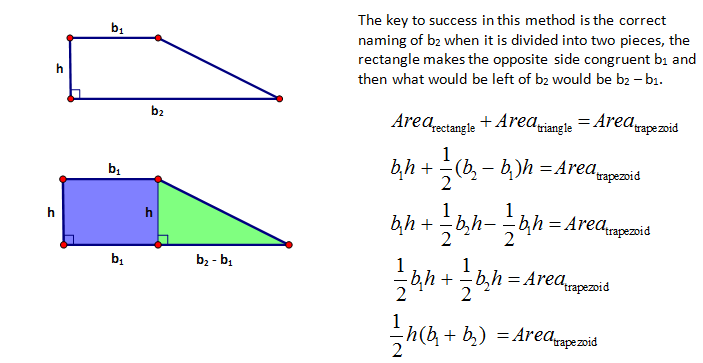
A trapezoid is a rectangle and a triangle.
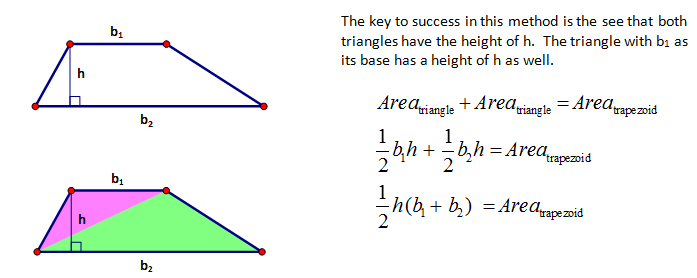
A trapezoid is two triangles.
Due to space and time I will not do anymore of these but as you divide the trapezoid up differently it yields quite easy level algebra operations to come to the same conclusion that A = ½ (b1 + b2)h.
REGULAR POLYGONS
Regular polygons are of interest to us because we begin looking at the volume of a hexagonal prism or a Tetrahedral and to do these types of calculations we need to be able to solve first for their areas. The term regular refers to a very specific type of shape. It refers to the polygon that has all equal sides, all equal angles and the maximum lines of symmetry for that particular number of sides.
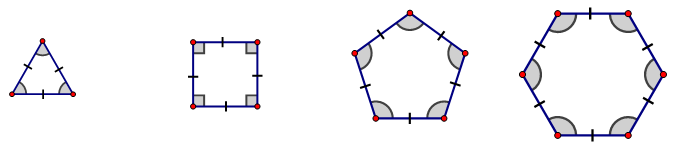 |
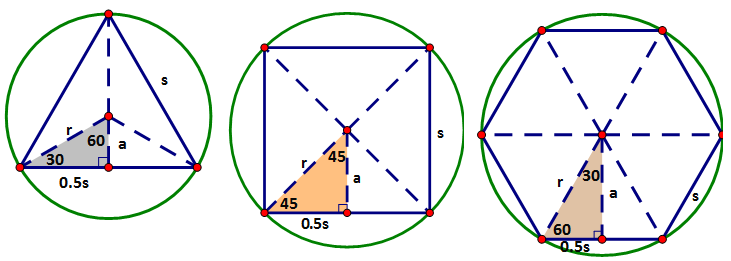
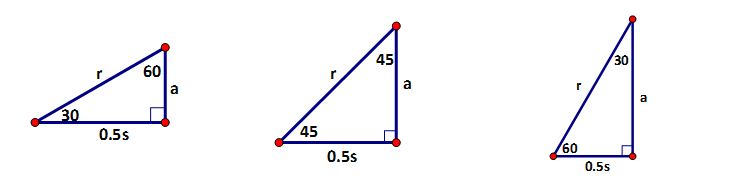
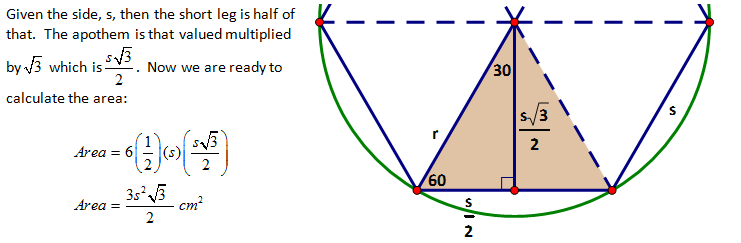
Regular polygons can be inscribed in a circle and because of this we apply a few new terms to these polygons. First of all, each regular polygon has a center and a radius because they are inscribed in the circle. The other new term is the apothem. The apothem is the perpendicular distance from the center to a side of the regular polygon. In the equilateral, square and hexagon the triangles that are formed by the radius, the apothem and a side are all special right triangles. In the cases of the equilateral and hexagon it is a 30°- 60° right triangle and in the case of the square a 45°- 45° right triangle is formed. These triangles are very important in helping us determine the area of these regular polygons.
| Teacher Note: This is one of the reasons why we emphasized special right triangles back in Unit #2. Special right triangles provide us exact answers. Great Review!! |
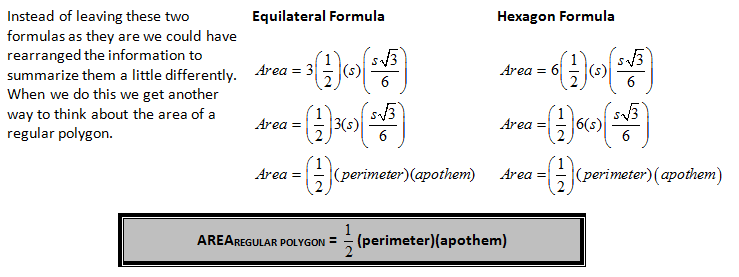
The way to visualize area of these regular polygons is to calculate the area of congruent triangles inside them. We find the area of one triangle and then multiply the area by 3 (3 ≅ triangles) in the case of an equilateral or by 6 (6 ≅ triangles) in the case of a hexagon. Let’s do a few examples so you can see the steps.
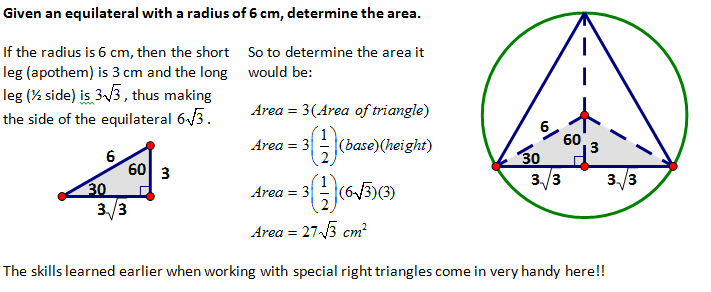

These types of questions vary concerning what the given information is but they all resort back to the special right triangle inside the equilateral triangle, the square or the regular hexagon. Two formulas that provide shortcuts for area are derived when the side length is given.
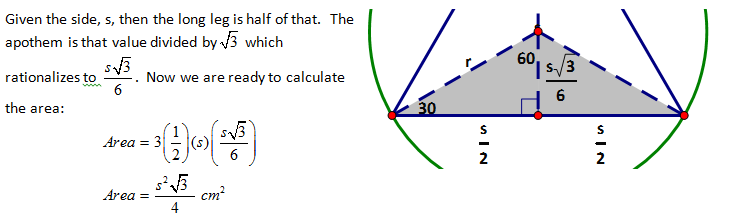
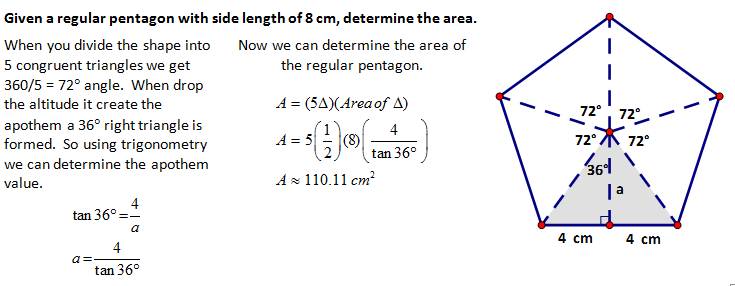
For all of the other regular polygons, trigonometry is needed because the angles within their triangles are not the special ones. Let me solve one of these to demonstrate the steps.
THE CIRCLE
The circle definite poses a different type of problem when trying to derive the area of it. It obviously needs to be approached differently from the polygons that we have already discussed because of its shape. We are going to use an informal limit argument to help us determine its area formula. Limits in general are an upper level mathematical idea but when presented in a visual way they can be understood at earlier levels.
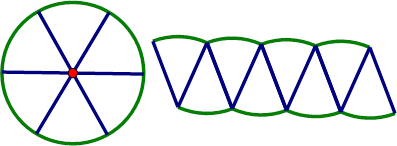
CIRCLE – DISSECTION (LIMIT ARGUMENT)
Once again we are going to take the original shape and cut it up into smaller pieces to form a shape that we already know a lot about.
| Teacher Note: This is a fun exercise and a nice way to use an informal limit arguement. |
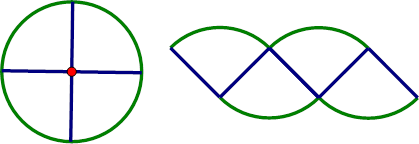
| The first dissection cuts are 90° sectors. When we put the four pieces together to form a new shape we get something that isn’t very recognizable. |
The second dissection cuts are 60° sectors. When we put the six pieces together it seems to form a more recognizable shape… maybe a parallelogram but the sides are ‘bumpy’. |
 |
 |
| The third dissection cuts are 30° sectors. This definitely is making the shape look a lot more like a parallelogram. |
Finally, our fourth attempt we use 15° sectors. This makes the new shape more and more parallelogram like… that is the intent of the limit argument. |
 |
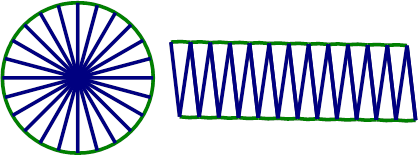 |
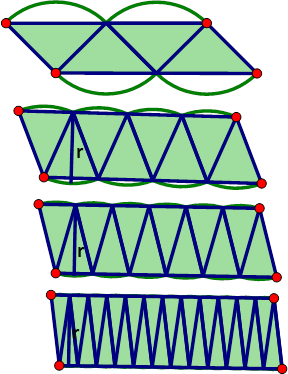
If we continued this process down to an angle size of 1° or even 0.0001° the new shape would approach the parallelogram shape. This is the limit argument. As we decrease the angle size of the sector the area begins to approach the shape of a parallelogram. Now lets look at the dimensions of that parallelogram. The height approaches the radius, r, of the circle. Notice how r is NOT the height in the second example but by the fourth example r looks to be very close to the height. Now we need to look at the base value. The base value is half of the circumference of the circle, the circumferene of the circle is half divided into two halves. If we put this together we get Area = ½ (2Πr)(r) = Πr2 using this informal limit argument.
|
 |
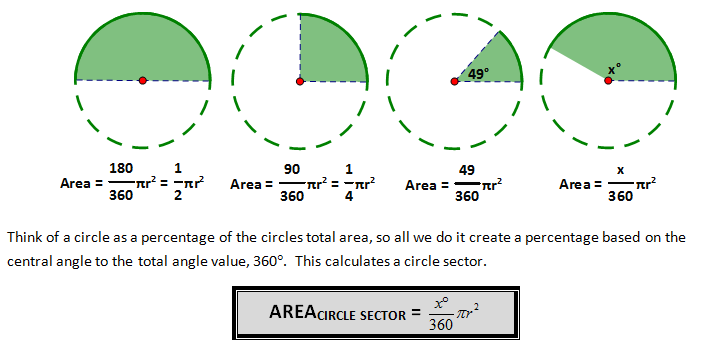
AREA OF A CIRCLE SECTOR
A sector of a circle is a part of the circle formed by two radii and the circumference. It looks like a pie piece. Often we are asked to calculate circle sectors whether it be half of a circle, a semicircle, or a quarter of a circle. These divisions are easy to visualize and calculate. If you want to calculate the area of a semicircle you divide the area by two or in the case of a quarter you divide by four. It becomes more difficult if the sector has a 49° central angle…. What do we divide by now?
CONCEPT 4 – THREE DIMENSIONAL MEASUREMENT
The third dimension has a new vocabulary that we need to familiarize ourselves with before we can begin looking at formulas or calculations.
A Solid – A three dimensional closed spatial figure.
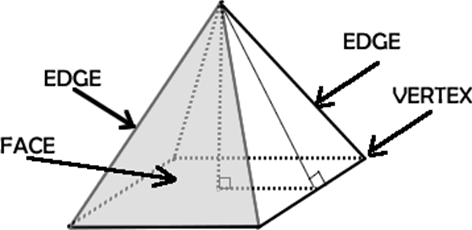
A Polyhedron – a geometric solid with polygons as faces.
A Face of a Polyhedron – One of the polygons that form the polyhedron. Sometimes these get called sides but the better term is face.
An Edge – The intersection of two faces of a polyhedron.
A Vertex – The intersection of two or more edges. |
 |
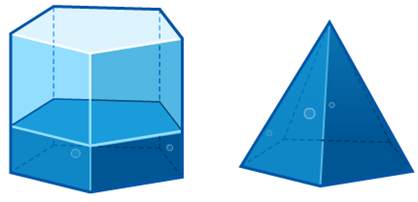
THE PRISM
A prism is a polyhedron that consists of a polygonal region and its translated image in a parallel plane, with quadrilateral faces connecting the corresponding edges. WOW…. That sound pretty technical… and I guess it is. Let’s try to clarify that definition with a few examples.

The two congruent faces that have been translated into parallel planes are called the bases of the prism. The faces that are not based are called the lateral faces. All of these examples are right prisms which mean the base and lateral edges are perpendicular to each other. When working with right prisms the height of the prism is also a lateral edge.
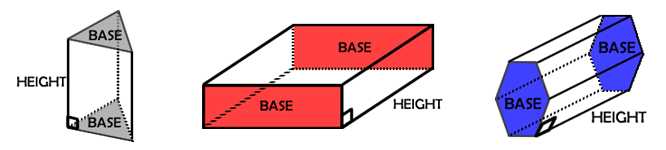
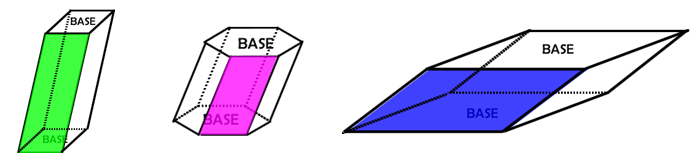
A common misconception is that whatever face the prism is ‘sitting’ on is the base – that IS NOT HOW THE BASE IS DETERMINED!! The height of the prism is the perpendicular distance between the two congruent bases. That brings up another item is about naming – we name a prism by its base shape We in these examples we have a triangular prism, a rectangular prism and a hexagonal prism.
If the base and the lateral edges are NOT PERPENDICULAR then the prism is called an OBLIQUE PRISM. When the prism is oblique the lateral faces are not rectangles, they are parallelograms as shown.
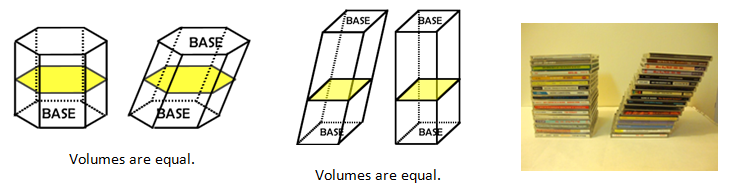
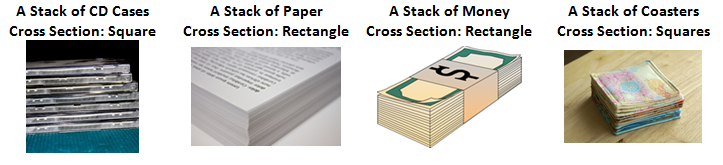
PRISM VOLUME – THE STACKING PRINCIPLE
A powerful technique to use when calculating the volume of a prism is stacking. For example, the stack of CD’s is a solid made up of many square cases upon each other or the volume of paper made up of stacking many rectangular sheets (8 ½ by 11) upon each other or money or coasters. All of these cross sections have a height dimension but if we make that height infinitesimal small we begin again to approximate the relationship more accurately.
Because in a prism we have two translated congruent bases in parallel planes (the bases), all of the cross sections are also identical to the bases. So to calculate the volume of a prism we calculate the area of the base and then multiply it by the height of the prism – thus stacking that area on top of itself to fill in the volume of the shape.
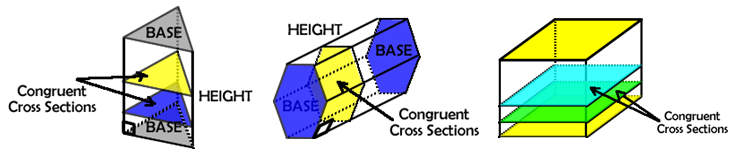
The stacking of congruent parallel cross sections allows us to create a formula for the volume of prism.

Bonaventura Fransesco Cavalieri (1598-1647) was a disciple of Galileo and he investigated this stacking principle. He came to define what is now known as the Cavalieri Principle:
If the areas of the cross sections of two solids by any plane parallel to
a given plane are invariably equal, then the two solids have the same volume. |
In other words, if two prisms have the same height and the same base then oblique and right prisms will have the same volumes. This is a little like the shearing technique but in the third dimension.
This will be helpful with volume of future shapes where we can use a simple cross section of equal area to determine the volume of more complex solids.
THE CYLINDER
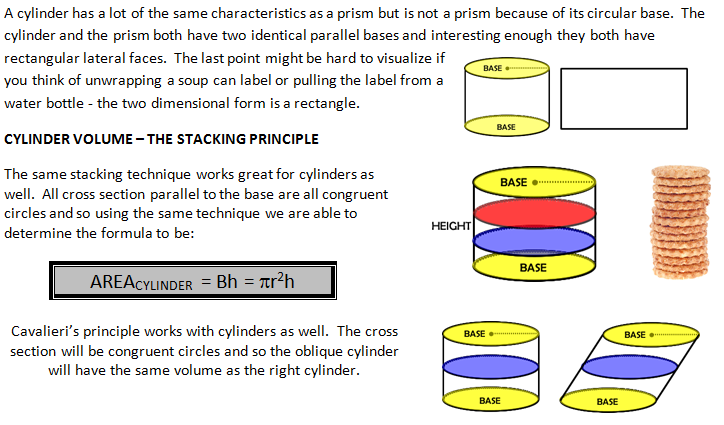
THE PYRAMID
To establish the pyramid volume formula we can approach it informally a few different ways. To derive the formula rigorously it requires more mathematics than we have at this level and so here we will simply discuss the informal arguments for this formula.
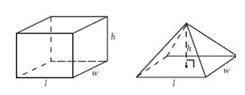
PYRAMID VOLUME – POURING
The classic demonstration is to fill a pyramid with sand or water and then pour that sand or water into a prism that has the same base and height. It is truly a mathematical thing of beauty that exactly three of these fill the prism. From this we informally learn that the volume of a pyramid is 1/3 the volume of prism with the same base and height.
|
 |
PYRAMID VOLUME – CAVALIERI’S PRINCIPLE + INFORMAL LIMIT ARGUEMENT
Cavalieri’s principle tells us that two solids have the same volume if they have the same cross section area over the same height. Obviously the pyramid will not have the same cross section area as the prism but we can watch the relationship between these two shapes as we add more layers to the solids. This method is an approximation because our pyramid does not have smooth sides but working with the pyramid this way will help us to discuss a pattern that we can extrapolate from.
As we progress by adding layers to the prism and pyramid we watch the ratio between the two volumes do two very important things:
(1) the difference in the ratios get smaller and smaller.
(2) the value of the ratio approach 0.333 or 1/3. |
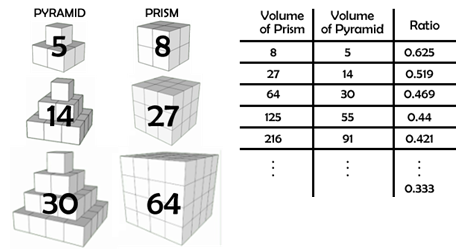 |
This is a great exercise to do with a spreadsheet because you can create prisms and pyramids that have 100’s of layers very easily. So why does the value approach 1/3 when we have 100’s layers? When we have that many layers the pyramid faces seem to be almost smooth… it is becoming more and more like the real pyramid. This informal limit argument helps us to confirm the relationship. |
 |
THE CONE
The cone and the cylinder relationship follow the same pattern as the pyramid and prism just did.
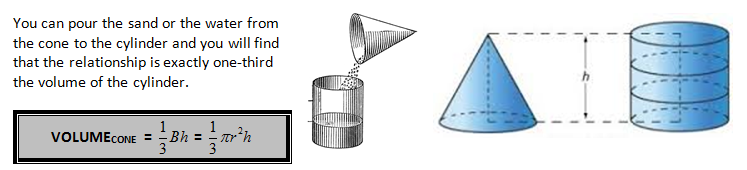
You can also use the same argument about approximately the volumes by stacking cylinders upon each other can compare those to the volume of the cylinder. This limit argument will again display the relationship when the number of layers becomes very large. |
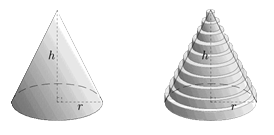 |
|